
Melon’s Tapa 5 Walkthrough
This week’s Friday Tapa was a tough one, with many questions both from readers and test-solvers on what the intended logic is. This post will answer that question completely.
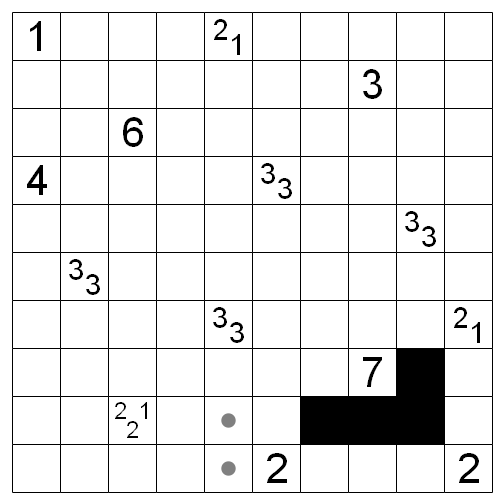
The image below shows where the first step is.

Here, I’ve drawn four colored L-shapes, each one occupying four of the consecutive spaces that surround one of the larger clues in the bottom right. 3,3 and 7 clues have an important property: in any four consecutive spaces around them, at most one can be unshaded. We have four of these clues, so there are at most four unshaded cells in the colored areas.
I have also marked four of the grid’s interior vertices with a large dot. Each of these dots is at the center of a 2 by 2 area of the grid. All four of these 2 by 2 areas are colored in and do not share any cells among themselves. Thus, by the 2 by 2 rule in Tapa, the colored area needs at least four unshaded cells.
If you combine the results of the first two paragraphs, you learn that we need exactly four shaded cells in these colored areas. More importantly, the yellow area around the 7 must have an unshaded cell. That is the 7’s only unshaded cell, so the remaining uncolored cells around the 7 must all be shaded.
This gives you information about the 2 in the bottom center, which then allows you to resolve the 2,2,1 to its left completely. At this point, the puzzle is no harder than a Tapa from earlier in the week.
It’s possible that many of you found this break-in a bit unsatisfying or unfair. Actually, I kind of hope you do, because as it is presented above I also am not partial to it. Above is what I would consider the “mathematician writeup”, in the same vein of how math papers prove their results but explaining motivation within the paper is taboo. When I make a hard puzzle like this, my direct aim is not to have a complicated logical step like you see above. My immediate goal is instead to encourage the solver to explore the puzzle. To that end, let me show you a different route to finding this step.
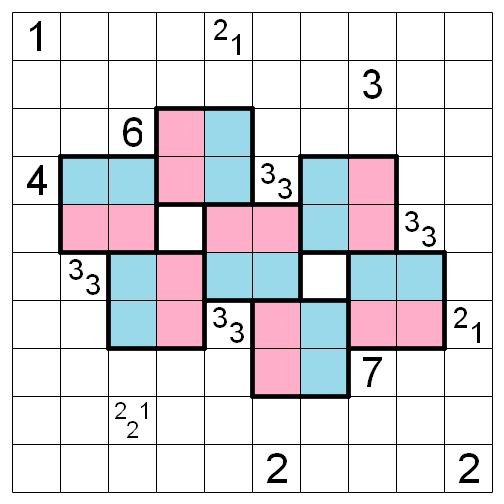
The key idea is how two clues that are exactly this distance (3 spaces on one axis, 1 on the other) have some “communication” through the 2 by 2 square rule. Particularly if the clues are high and need lots of shaded squares. In the above diagram, the 2 by 2 areas where this communication occurs have been boxed in. Notice that within a boxed area if a colored domino is fully shaded, then the other domino in the box cannot be fully shaded. Additionally, think about how 3,3 clues work. If a red domino around a 3,3 clue is fully shaded, then the blue dominos are not fully shaded, and vice versa.
When we combine these two observations, we find the red and blue dominoes around 3,3 clues will alternate. If one red domino around a 3,3 clue is fully shaded, all of the red dominoes around 3,3s are fully shaded, and all of the blue ones are only partially shaded. The reverse is true if a blue domino is fully shaded. If the reason for this is not clear to you, try fully shading in one of the dominoes in the image and do deductions on the 3,3s from that point.
That explains the dominoes around the 3,3s, but how shall we deal with that 6 and 7? There’s not a whole lot to be done with the 6, since it can have two adjacent partially shaded dominoes. But the 7 is even more interesting than the 3,3s. It can only have one partially shaded domino, and everything else is fully shaded.
Now the logic I explained above should be clear. If we try to fully shade in both the red and blue dominoes around the 7, the alternating logic we developed earlier will break. Another way to see it is that if we fully shade in the 7’s red domino, the 3,3s will cause a chain reaction of deductions that eventually show the 7’s blue domino is partially shaded. The same occurs if we fully shade in the 7’s blue domino. Either way, we have narrowed down the range of spaces for the 7’s only unshaded square.
A similar kind of exploration may benefit you in this Saturday’s Statue Park. I don’t plan to do a full discussion of that puzzle here, but if two of the shapes use an odd number of black circles in a clue configuration like that, there are many implications about connectivity. You’ll need to know those implications to find the most essential step of that puzzle.
This IS how I broke into the puzzle. After a puzzle hiatus of a few weeks, I find this very satisfying. 🙂
I went the second, more roundabout way of sifting through the interaction chain and eventually realizing the impact of the 7 clue (which took me long enough). Satisfying to crack, though.