
Ask Dr. Sudoku #9 – No Time to Close the Loop
Ninth in a series with puzzle solving tips. This time with advice on Slitherlink and loop puzzles in general.
Even if you had a good time on the TIME Slitherlink, the following walk-through might offer you some new tips — besides just memorizing Slitherlink patterns — to get better at loop puzzles.
The starting points to Friday’s Slitherlink come out of an original but abandoned theme where the T and M would be made out of odd digits and the I and E out of even digits. The original I with 02202 was edited by the end, and no more 0’s were added to the puzzle, but looking near 0’s is always a good idea and does get one started here.
While there aren’t many simple patterns to be found and fully drawn, the 33 areas affect nearby clues significantly here as in most puzzles. I almost never draw the 3 lines and certainly never the 2 x’s on 33 clues until I draw the whole S shape (to save time), but you should be able to consistently visualize some of the red X’s in this image. The few segments around the top 3 on the T come from knowing the 1 above the 33 is already used up. Another key observation is that a 33 cannot have a line going into the middle; consequently, the 02 that normally has 3 options cannot use the right segment which lets you draw in another bit of loop (and even more on the right side if you think about it).
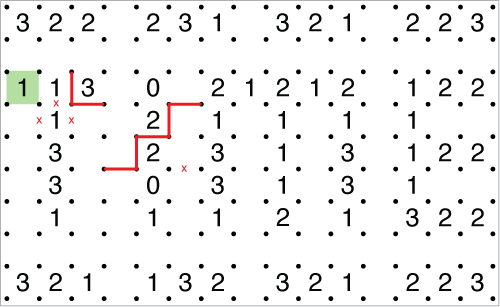
Now, we encounter one of the first of several don’t close the loop scenarios, mostly involving two flexible ends that can either close or both go into a 3. Consider the 1 in green above. If the top edge is used, it immediately draws a little O shape and makes two or more loops in the grid. So use the left edge instead. Continuing forward, you should progress to this state.
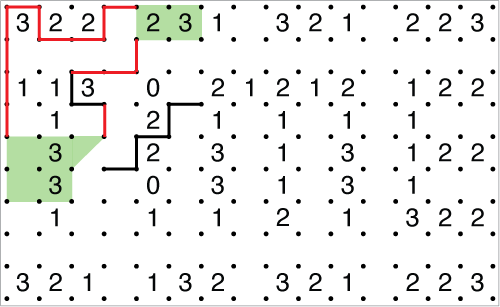
Notice that while the top 23 area in green has two options, both bring those ends together to close that part of the loop. This makes the other area in green really important to consider. Notice that one of the two ways the 33 can go will cause the two open ends in that area to come together, effectively closing the loop even though you haven’t drawn all the connections yet. Getting a feel for when the ends are going to come together is useful.
More standard steps get you to the one sticking point a lot of people identified: dealing with the middle of the M. There are a few ways to get through this spot, but the simplest logic looks something like this:
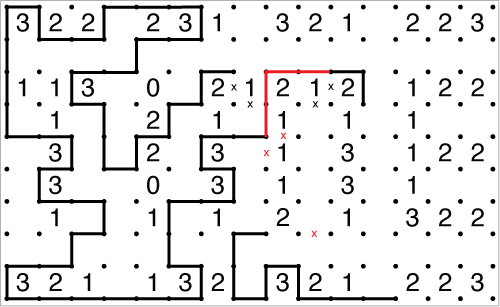
Note that the end near the 2 clue at the bottom of the M needs a way to get out and this cannot be below the 33 to the right. This rules out a horizontal connection above through the 11 (which connects to the 33) as it strands a single end in the bottom of the puzzle. Further, there cannot be a segment going down through the 11 as that strands two ends in the bottom of the puzzle when considering the right side of the 2 clue which gets drawn in.
One last “don’t close the loop” scenario plays out before the end.
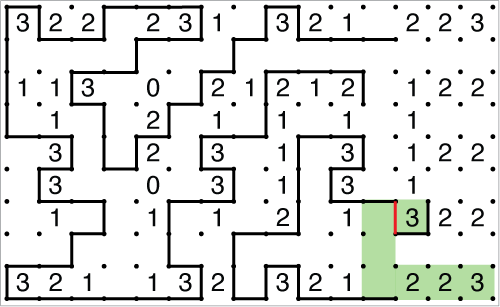
Here again, consider the regions in green and what happens if the end at the top 3 connected down to the bottom. There is no escape through the 223 area for two ends to stay separate, however it is drawn. Isolated 3’s always close the loop! So the line segment in red can be deduced from needing to make one big loop and keeping the ends separate.
I hope these tips save you some time in the future, by helping you learn to visualize loops — and particularly loop closing situations — better.
That seemed way more complicated than I remembered my initial solve being, so I just re-solved. I used don’t-close-the-loop reasoning in two small, localized, loops in the upper and lower left, and pretty much common rules everywhere else.
It’s hard to know what “common rules” are for different solvers. I find global topology rules to be just as common as more local things, so if this seems too complicated it just means we look at things differently.
I didn’t use the logic in the third and fourth image either. For me it’s easier to just keep track of all lines and crosses properly in those areas. Thomas might be able to save time to visualise a lot of things but I prefer just to note all my deductions on paper. For me personally that’s just a lot quicker.
Very advanced indeed!
Just seeing the way you say that to save time you dont write Xs(which would hardly take half a second) but visualise them amazes me and also shows to me the confidence that you have in yourself and your visualising skills!!I m glad that i am giving an attempt to solve the puzzles daily created by a wonderful author!!!Will try to visualise a bit more from now on .
Nice walkthrough again motris .Dont think i learnt anything in particular after seeing this walkthrough but i certainly got to know a totally different facet of puzzling which is more important.(Would still take some time for the fact to sink in that to save time you dont write Xs but visualise them!!!!!)Exceptional
Don’t take the wrong advice – writing X’s can be valuable in the right spots. What I’m trying to say is in many spots, like around 33’s, my brain just sees the X’s without needing to put them in.
A different way to save time, based on writing less, would be to have a single line slash in place of an X. My US teammate Wei-Hwa Huang actually draws an inner and outer loop so all unused blocks get a perpindicular line that splits where the normal line would go. He is very fast at these puzzles, and at the end of the day has effectively marked all X’s. So continue with whatever style works for you.
I have always used little slashes instead of x’s. I’m surprised how many people here say that they use an x. I do have to mark almost all of them, to assure myself that I have found the unique solution. Often I don’t trust my “instinct” (not really instinct, but more global patterns of thinking) even when it ends up being correct.
For really huge Slitherlinks, I sometimes shade some of the squares that are outside of the loop in order to more quickly spot “don’t close the loop” situations.
I also find, once the puzzle is 36×20, that I shade the inside a lot as a routine to not miss close the loop steps. With the poster-sized Slitherlinks Nikoli has released, I’ve planned to always shaded the loop, but change colors of colored pencils between hour-long sessions so I end up with a nice piece of abstract art.
I’ve never found a colored pencil I can erase, so none of that for me. Just good ol’ black.