
Ask Dr. Sudoku #3 – Boxed-Into that Star Battle?
Third in a series with puzzle solving tips. This time, a dissection of Saturday’s Star Battle.
Jack Bross left an excellent set of starting tips for Star Battle in Dr. Sudoku Prescribes #14 so if you are struggling with these puzzles, start there. The hard Saturday puzzle required some unusual group recognition which I thought deserved to be highlighted.
The Boxed In theme comes from these sub-groups of regions.
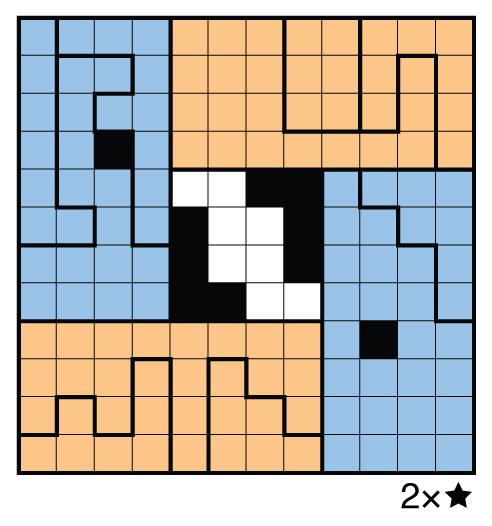
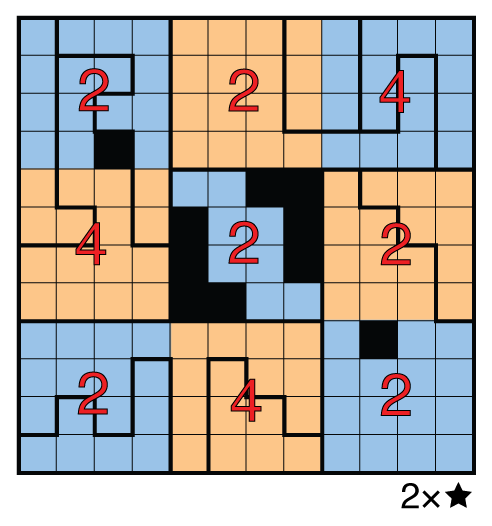
It is usual to count up boxes in rows or columns to figure out extra/left-over stars. But this geometry allows the whole puzzle to be split into 4×4 regions with either 2 or 4 stars as shown below. This is because the 4×4 corner that is not part of each 4×8 rectangle has a fixed number of stars and you can work out from there. Having these counts in mind, particularly in the very upper-right corner, will be key to make progress in the puzzle.
A first pass at the puzzle with this knowledge should place these almost stars and gray out these impossible to use cells. Not all of these deductions are trivial but you should think your way through any grayed out cell that seems unusual to you.
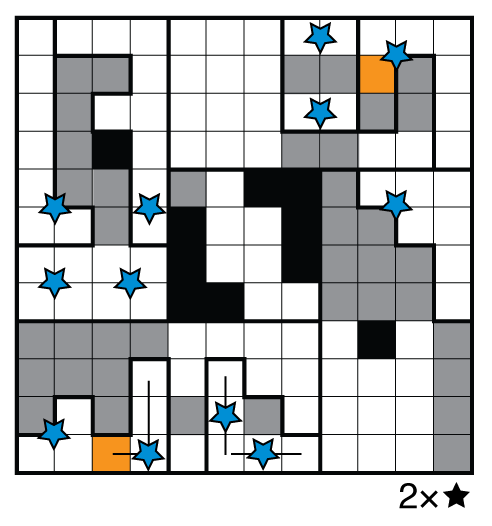
There are two key spots to make progress in, both marked in orange. In the upper-right 4×4 square there must be 4 stars. Notice how filling in the orange cell would prevent there being 4 stars in this subregion so it can be excluded. This now places 2 stars in the top row and blanks out the rest of it, which sets it up for a future deduction.
A “push” logic works on the bottom. Often, when you have two stars almost placed close together, putting one in a specific place will push the other into a specific place too. Notice that putting a star in the orange cell places another in the bottom row (now for 3 total stars in that row). That isn’t allowed, so that star must be in the 4th column and now you can place other stars into the 3rd column as the 4th is filled. Keep doing this and you should be able to get a lot of the stars placed as in this image.
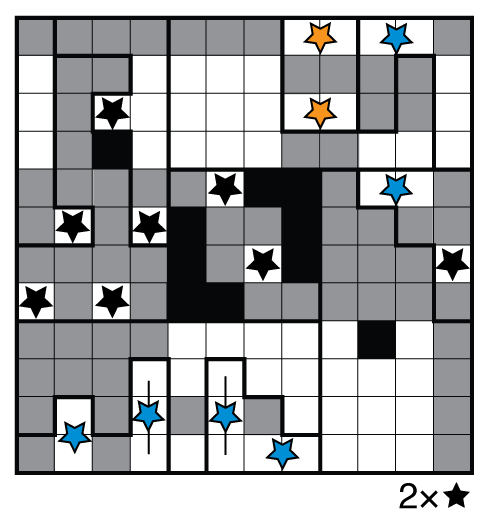
The final steps come from remembering you need 4 stars in the upper-right, which moves both orange stars over to the right. To finish, try to complete the 4th row up top, and try to complete the 5th column in the bottom, with the basic eliminations you can now perform. Master the art of “push” logic and counting up regions and subregions and you’ll get much faster at these challenging Star Battle puzzles.
Thanx for this nice explanation of the logic.
You woudn’t believe how thrilled I was to see the numbers
224
422
242
because I was very proud of myself that I found that reasonably quick. 🙂
I tried to hint at that comparing the grid to the 9 blocks in Sudoku.
But some of the steps I couldn’t figure out immediately.
Can you explain why I should discard at the first pass cells r3c2, r4c2, r5c2, r5c3, r6c3, r5c5, r3c10 and r3c11 ?
Maybe I understand wrong but isn’t also key for the orange cell in the upper right that col 12 has 1 star in row 1-4 and the other in 5-8. Maybe you could place these 2 almost stars in your images (or explain why that is not needed) ?
But Kudos to a very nice puzzle !
(is it still hip to say ‘Kudos’ ?) 🙂
(is it still hip to say ‘hip’ ?) 🙂 🙂
P.S. I send you a star battle of my own (inspired by the last 2 star battles). If you like it feel free to post it here.
I’m sure it’s no problem to answer for Thomas here.
For all grey cells in R3C2, R4C2, R5C2, R5C3, R6C3, R5C5, it’s basically one answer: Take a good look at the square R5C1-R5C4-R8C4-R8C1 as it needs needs 4 stars. There are 3 regions in that square. 2 of the regions only cover enough cells to place a single star in that region. This means the third region needs both its stars in that square to make 4, so all cells of that region not in that square can’t contain a star. R5C2 remains empty because it touches all three cells from one region, which have to contain a star. R5C3, R5C5 and R6C3 are empty because they all touch both 2 cells of the second region, which have to contain a star.
R3C10 and R3C11 weren’t instant for me either, but the logic is fairly similar. For R3C11, you have to realise R1C89 has to contain a star, which means R1C10-12 can max contain 1 star. If R3C11 was coloured, those would need 2 stars to fulfill the right top region.
For R3C10 you have to take into account the square R1C9-R1C12-R4C12-R4C9 needs 4 stars. Most cells are covered by left right top region. If R3C10 was coloured, only 1 cell outside that region would remain empty, so you could never colour 4 stars in it.
I hope this is clear enough. For me seeing R3C10 should remain empty was the key insight to solve it as the second image came really quickly to me.
Thanx Bram for your reply, I will look into that in detail !
@ Thomas : I’m sorry I guess the star battle I sent you has (at least) 2 solutions, so unfortunately not unique 🙁
Thanks Bram – I’ve been very occupied this weekend so couldn’t reply but you’ve covered all these points and very clearly!
I dont understand head or tail out of this walkthrough.How did you allocate 2 or 4 stars in each of the sub-regions and when you say 4 * 4 corner is not part of each 4*8 rectangle what does that mean???where is the 4*4 corner that you are referring to????????????
You have to start looking at how many regions there are in each 4×8/8×4 rectangle. The (amount of regions)x2 is the amount of stars in that 4×8 rectangle. You know that each 4 rows/columns has to contain 8 stars, so the remaining 4×4 square which aligns with a 4×8/8×4 rectangle has to contain 12-(amount of regionsx2) stars. This way you can calculate how many stars are in each 4×4 corner square, which then leaves you to deduce the rest as well.
I am getting now..was chewing this puzzle in my brain right from morning and finally my brain threw this out..got a spark and finally understood the placements….Good puzzle!
When eliminating the bottom orange square, I can’t figure out why (at that phase) I can rule out a star in the orange square (r12c3) and in r10c4. Why are they mutual exclusive?
I’m not sure I understand the question, so please restate it if I am not answering right, but the context of the two squares you mention are quite different.
Only the square in R12C3, which eliminates the option in R11C2, forces another star into R12 which would put too many stars in that row considering the star in R12 in the bottom-center region.
None of the stars in C4 in that bottom region (not R10C4, R11C4, or R12C4) eliminate that potential spot in R11C2, so it is only much later in the solve that you can narrow down the options there. So at least as I see the puzzle those are mutually exclusive deductions and R12C3 must come first.
Thanks. Let me rephrase from another angle. How do you reach the conclusion that the bottom left region (the one with the orange square) has the almost-star pattern of R12C1-R12C2-R11C2 AND R12C3-R12C4-R11C4-R10C4?
At this phase of the puzzle, it seems I should consider the case of R12C3 and R10C4 as the only stars in that region, which prevents me from eliminating that orange square (again, at this phase).
I have (actually my daughter, 10yo) managed to complete the puzzle from there, and the orange square got eliminated much later.
Ah. That makes more sense as a point of confusion. I believe my goal of image economy may miss out on that rationale, but the simplest reason I can find right now is that once you take care of the upper-right corner orange cell, you eliminate R1C2.
So that there is a star in R12C1-R12C2-R11C2 certainly comes from the need to have a total of four stars in the first two columns and there not being any other place to put the fourth star anymore.
Thank you!
BTW, We love your site, My wife and daugther are constnantly slouched over a printout since we’ve discovered it. I’m mostly facilitating, but I enjoy it too.
Thanks for the explanation, Thomas! I totally missed the “boxed in” break-in you planned here. Now that I’ve read that first step, (and before I read the rest of the explanation), I think I’ll have to have another go at the puzzle and see how much this break-in helps reduce my time, (while trying to avoid relying on memory of course—which fortunately is easy for me—I can be quite forgetful).
Thanks as always.