
Ask Dr. Sudoku #2 – Take Less Time for Nurikabe Time?
Second in a series with puzzle solving tips. This time, Nurikabe solving tips for last Friday’s puzzle.
A few simple Nurikabe rules will get you through most of the puzzles quite fast; but some of these rules are uncommon enough that you mainly learn them from solving rare puzzles like ours.
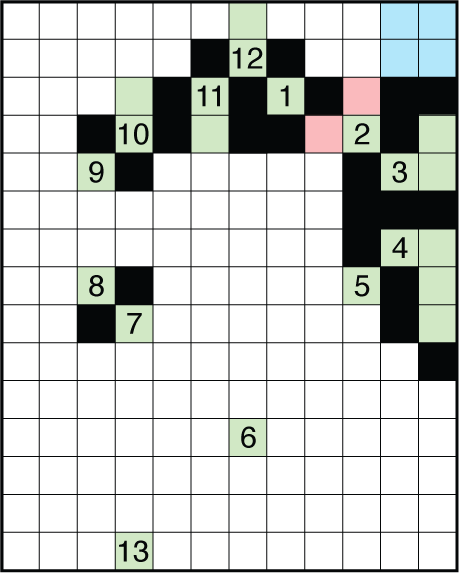
“Basic” Nurikabe steps get you to here (ocean in black, new island info in green). At this state there are two different visual cues that the upper-right is problematic. First, there is a wide open space that needs an island (in blue) and only one island can reach over there. Separately, because the 12 and 3 islands now touch the walls, the ocean in the upper-right is set to be cut off entirely. So the 2 island is not as free as it might seem (red). Noticing either will get you to the next steps, but getting good at seeing both will make you a Nurikabe Expert.
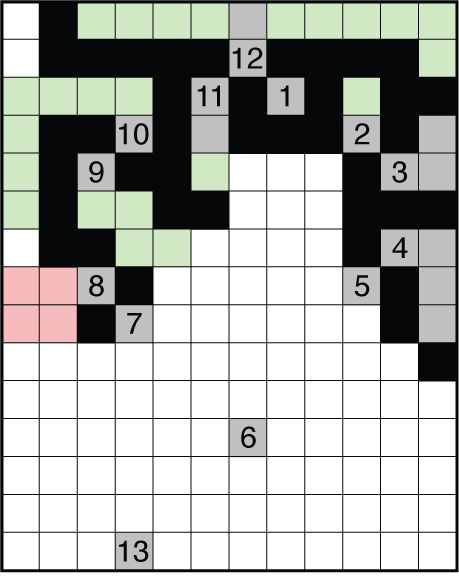
Nurikabe puzzles often involve gradually filling out 1-wide snaking islands and oceans and the whole left side of the puzzle flows out like this once you try to fill in the 10 island and see it runs out of room from colliding into the 8 and possibly isolating ocean. So the rest of the 10 goes up to the top and the 8 goes left and down with a 1-wide ocean on the border wrapping around it. You’ll see the same for the 7 and 9 and 11 next to it.
More of the same gets you to the “hard” ending, with a fairly open bottom and nothing immediately touching for the next steps.
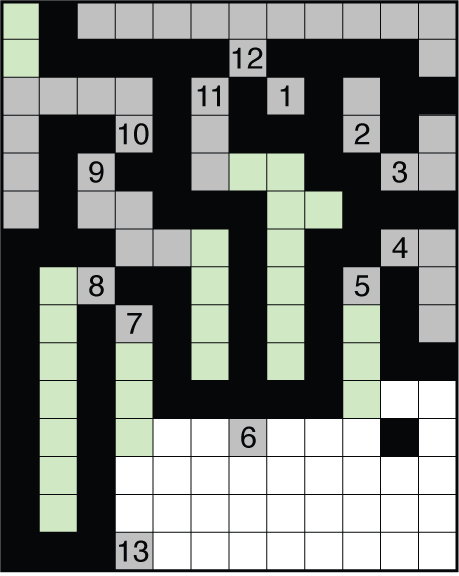
The 7 is easiest to resolve, and what is marked in green should have come logically. Finishing the 6 and 13 might not come as fast. One hard first step is to realize the 5 finishes to the right and not down. Hypothesis testing can take care of things like this, but slowly. For speed solving I often go into what I call “be greedy” mode where I take properties of unique puzzles and apply them to other settings. In this Nurikabe, the 6 and 13 feel like a “max” fill – the largest possible number of island cells that can occur in this puzzle. So you try to “be greedy” and simply make a very efficient fill and run head-on into the answer.
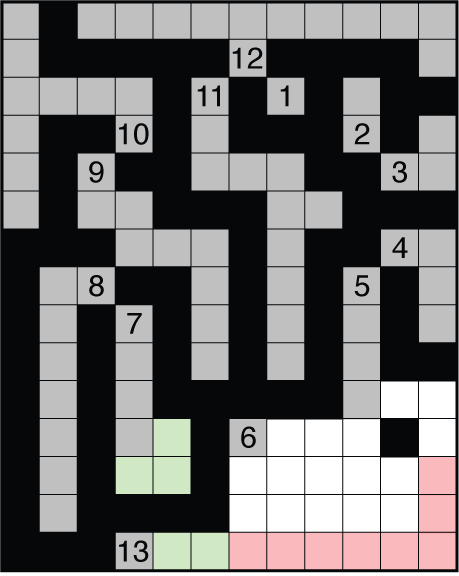
Here, as the start to a “be greedy” path, if there is a “max” fill then there can be no water on the bottom edge or the right edge up to where I stop shading in red. Once you place those 11 cells in, the other parts of the 6 and 13 and 5 should be much quicker. But feel free to try to logically prove it too. Forming rectangular shapes often maximizes the # of island cells, so you can work your proof around this packing concept.
This was a more standard Nurikabe when you get down to it, but the concepts of finding isolated oceans, or places only one island can reach, will be useful to master. And getting a feel for “be greedy” in all its forms (and it can be dangerous both to the puzzle but also to you if you make mistakes using it) will get you solving quite fast. Its close to uniqueness, but even more open to creative applications. Getting good at tweaking near solutions is a must when you go with “be greedy”, and I only learned to tweak very well from constructing puzzles where you have to do this all the time to just get 1 answer for your solvers.
I suppose one of the features about nurikabe is that it’s very easy to make a puzzle with a linear solving path. I got to your bottom image pretty much as you’ve described. For the final step, I visualised things slightly differently, using squeeze type logic for the area of “sea” (or, I suppose, the nurikabe) bordering the 4 & 5 islands.
Basically, if the 5 goes down, then the sea I just mentioned has a longer route to go to join up with the main area of sea. Visualising the U-shaped path the sea takes in this case shows you are eating up too much space to be able to fit the 6 in, bearing in mind you also have to squeeze in the 13 somewhere.
Perhaps this comes down to hypothesis testing as you put it in your post, but I think in that final picture the connectivity of the sea is the most natural place to be looking for a deduction.
It’s essentially two sides of the same coin, but I think my point is that there is often some not-so-hard underlying logic to the sorts of situations a solver might take a leap of faith and feel out a solution in the manner you’ve described. Not as hard as directly proving those 11 cells at any rate!
Yeah, my trick at this point was to note that the 13 has to get over to the right side, so (at the least) the 6 can’t touch either the bottom row or the row above since either of those eventualities would effectively block the 13. From there, its not hard to see that if the last square of the 5 is down instead of right, that the 6 will be squeezed onto the second row from the bottom.
I used similar reasoning in the top left corner. The 10 must directly touch the top or left sides. Therefore, it can’t connect with the 11, and the 9 (which will indirectly touch the top and/or left sides) can’t directly touch the left side. This led to me finishing (most of) the 9 and 11 before I filled in the 10.
“This was a more standard Nurikabe when you get down to it, but the concepts of finding isolated oceans, or places only one island can reach, will be useful to master”
You have hit the nail bang on the head motris..This one line pretty much sums up the entire puzzle.The bridging gap between an amateur and an expert solver.
Excellent walkthrough and this one line i will remember forever when solving this type of puzzle .The be greedy concept will be a bit difficult to implement for me but i will try to do it too in the later stages.
Excellent 2 weeks!!!!you have ended this week too in an awesome note..
There are a number of puzzle types that offer an interesting mix of local, strictly logical deductions with more global “the puzzle has to look something like this” logic. I think for beginning solvers, those more intuitive, large-scale moves seem a bit mysterious and frustrating. At some point, if you’ve solved a lot of a particular type, the penny drops and you start seeing how the puzzle has to fit together. That certainly happened for me with puzzles like Shikaku and Numberlink, and I think I’ve at least turned the corner on Tapa. At any rate, as this walkthrough illustrates, for Nurikabe probably the first step is transitioning from “where does this island go?” to “one of the islands has to go over here — which one is it?” and “how can the shaded squares connect to this part of the puzzle” and so on.